Create an Indexync Account: Signup, Plans and Setup
Creating an Indexync account has two parts. First you sign up with an email, password and country, and verify the address with a code. Then a short setup wizard collects your name and phone, lets you choose a plan, and gets you connecting stores and importing products. The Free plan costs nothing and needs no card; paid plans redirect to a secure hosted checkout page before you're charged.
Applies to: New users, all plans
Before you start
Have these ready:
- A business email address you can check right away (the verification code arrives here)
- Your country: Malaysia, Singapore, Philippines, Vietnam, Thailand, or Indonesia
- Your name and a phone number (collected in the setup wizard, not on the signup page)
- A payment card, only if you plan to choose a paid plan
Create your account
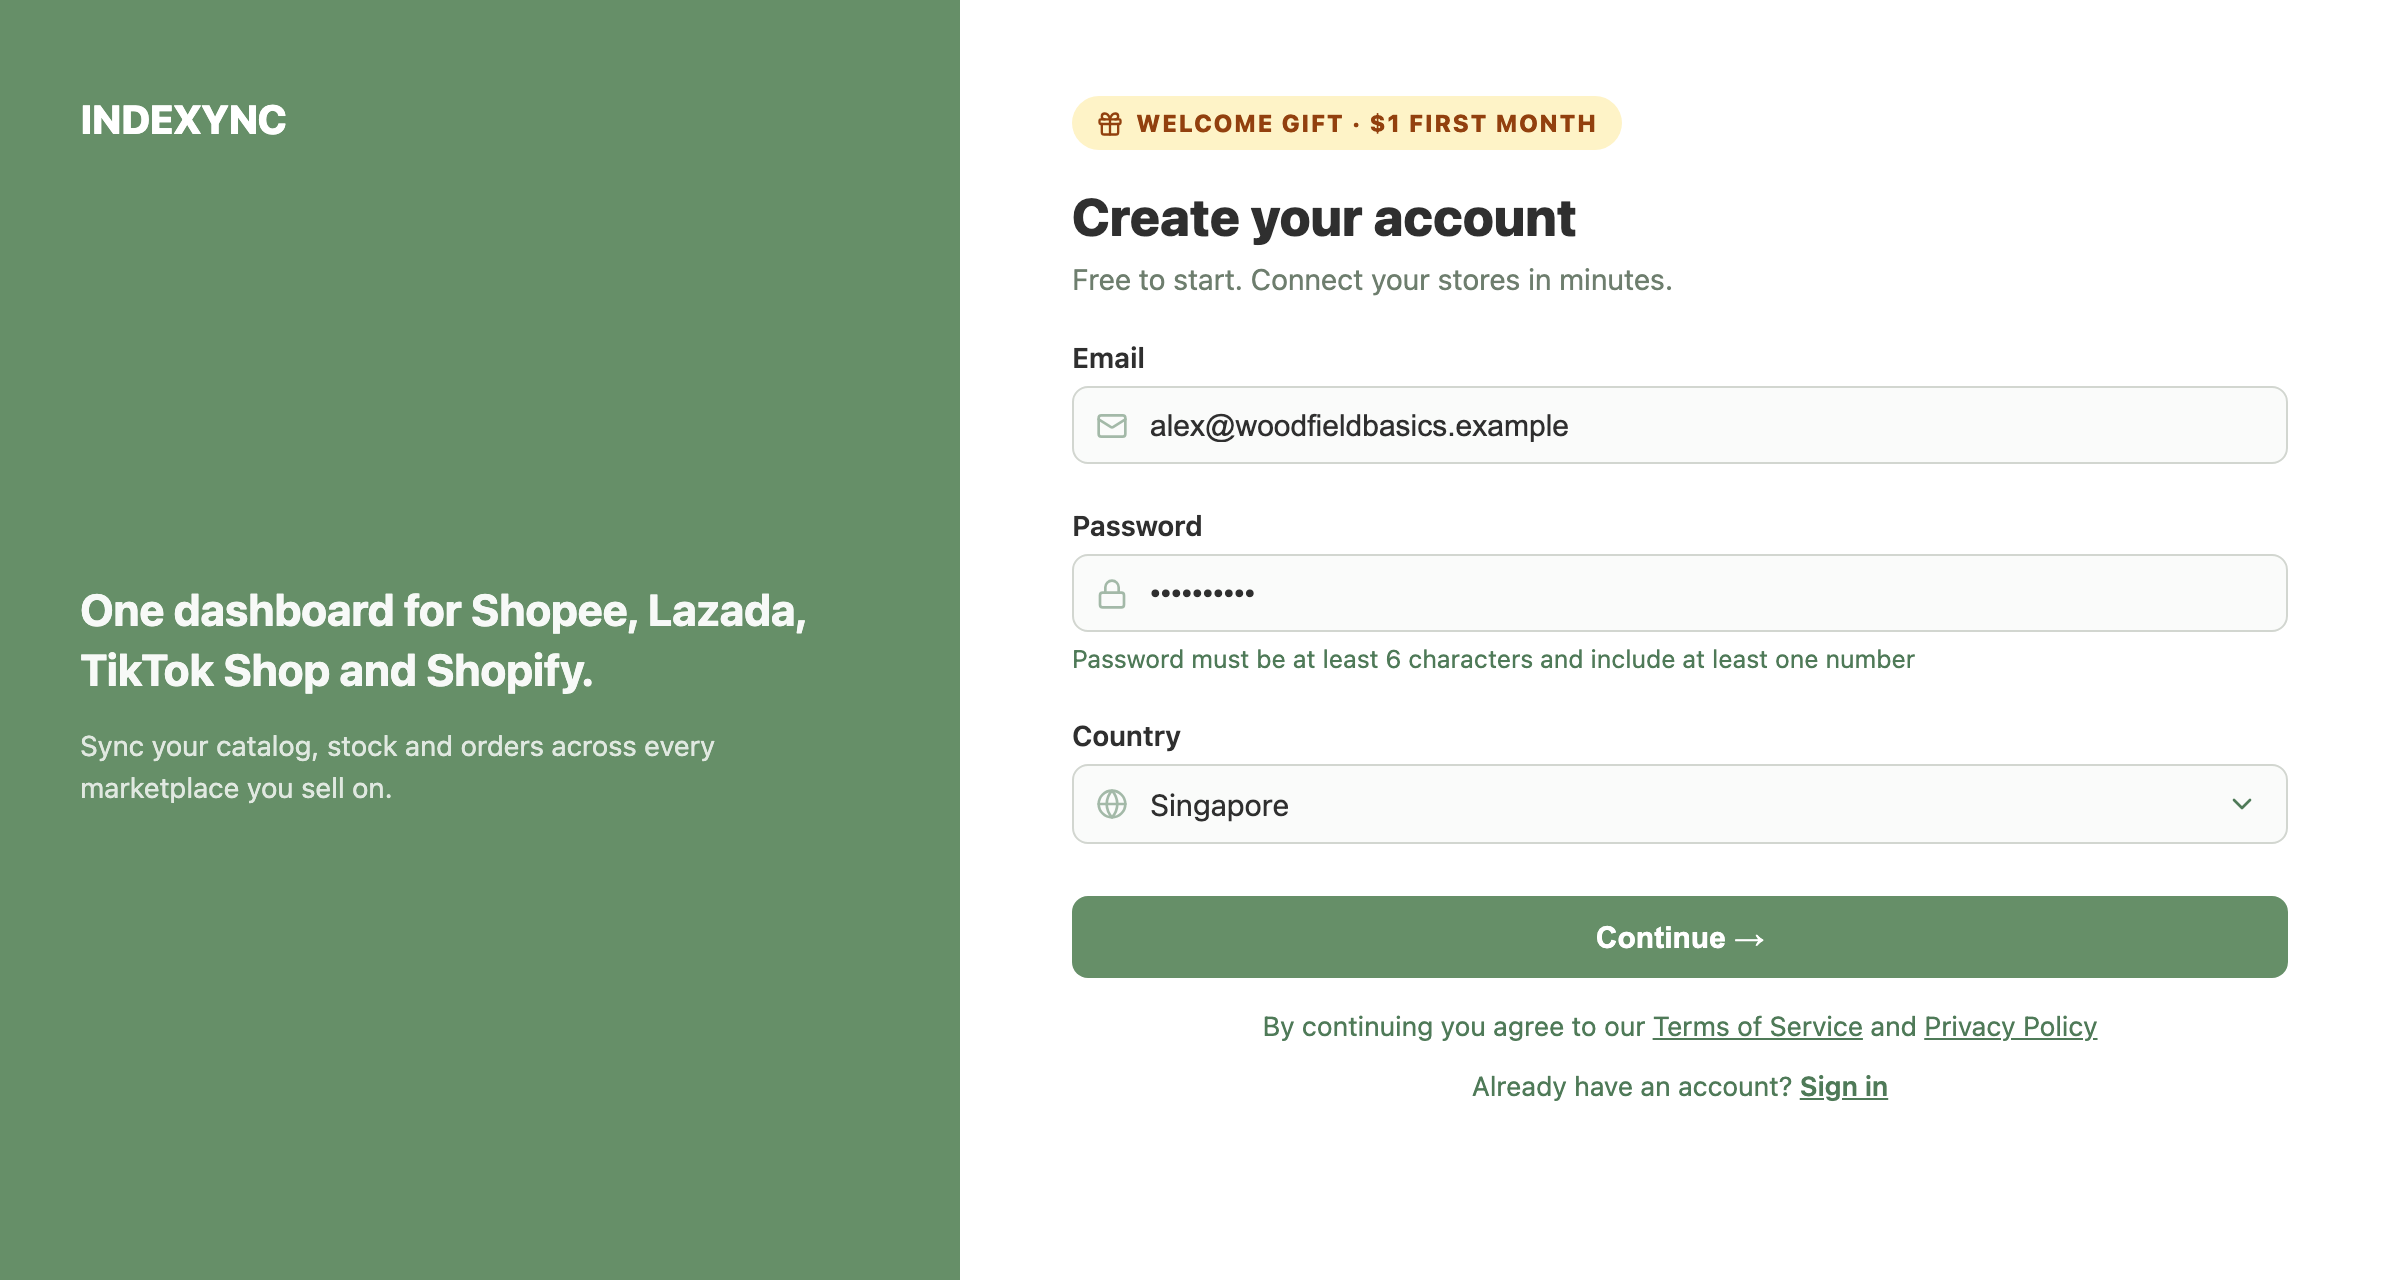
- Go to indexync.com and click Get Started or Sign Up.
- Enter your email and create a password. It needs at least 6 characters and at least 1 number.
- Select your Country from the dropdown.
- Click Continue.
Indexync emails you a 6-digit code.
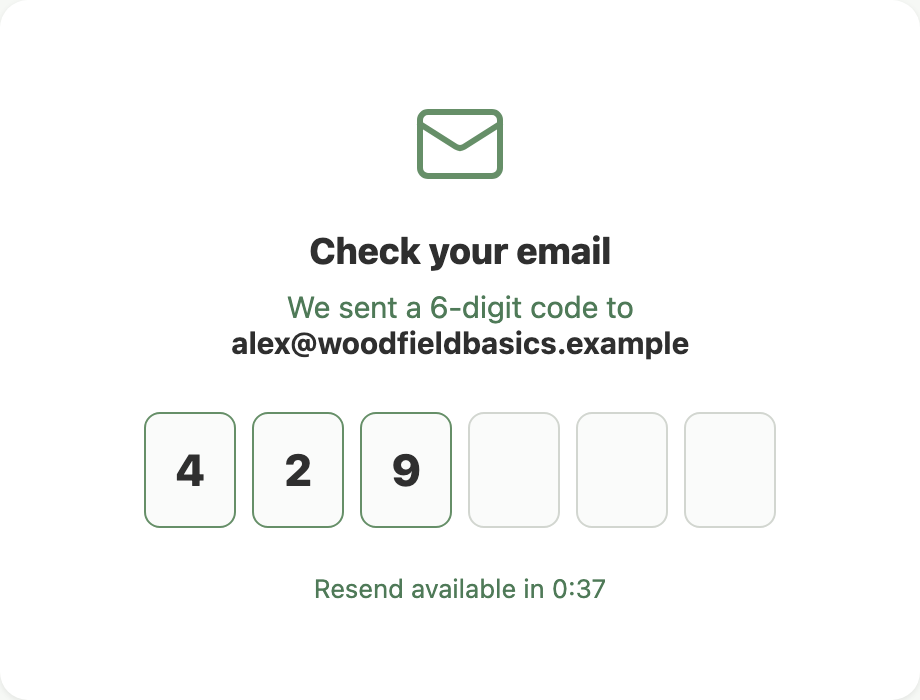
- Open your inbox and find the code.
- Type it into the 6 boxes. The code submits itself once you've entered all 6 digits; there's no separate Verify button.
Your account is created at this point. If you don't see the email, check spam and junk first, then use the resend link once it's available.
Complete your profile
The first step of the setup wizard asks for your name and phone number. This step is required; there's no skip option.

- Enter your First Name and Last Name.
- Enter your Phone Number. Indexync pre-fills the dialling code from the country you picked at signup.
- Optionally, select a range from the Roughly how many orders do you get a month? dropdown. This step doesn't require an answer, and you can leave it blank.
- Click Continue.
Choose your plan
Indexync shows four plans side by side. Pick the one that fits how many products and orders you expect.
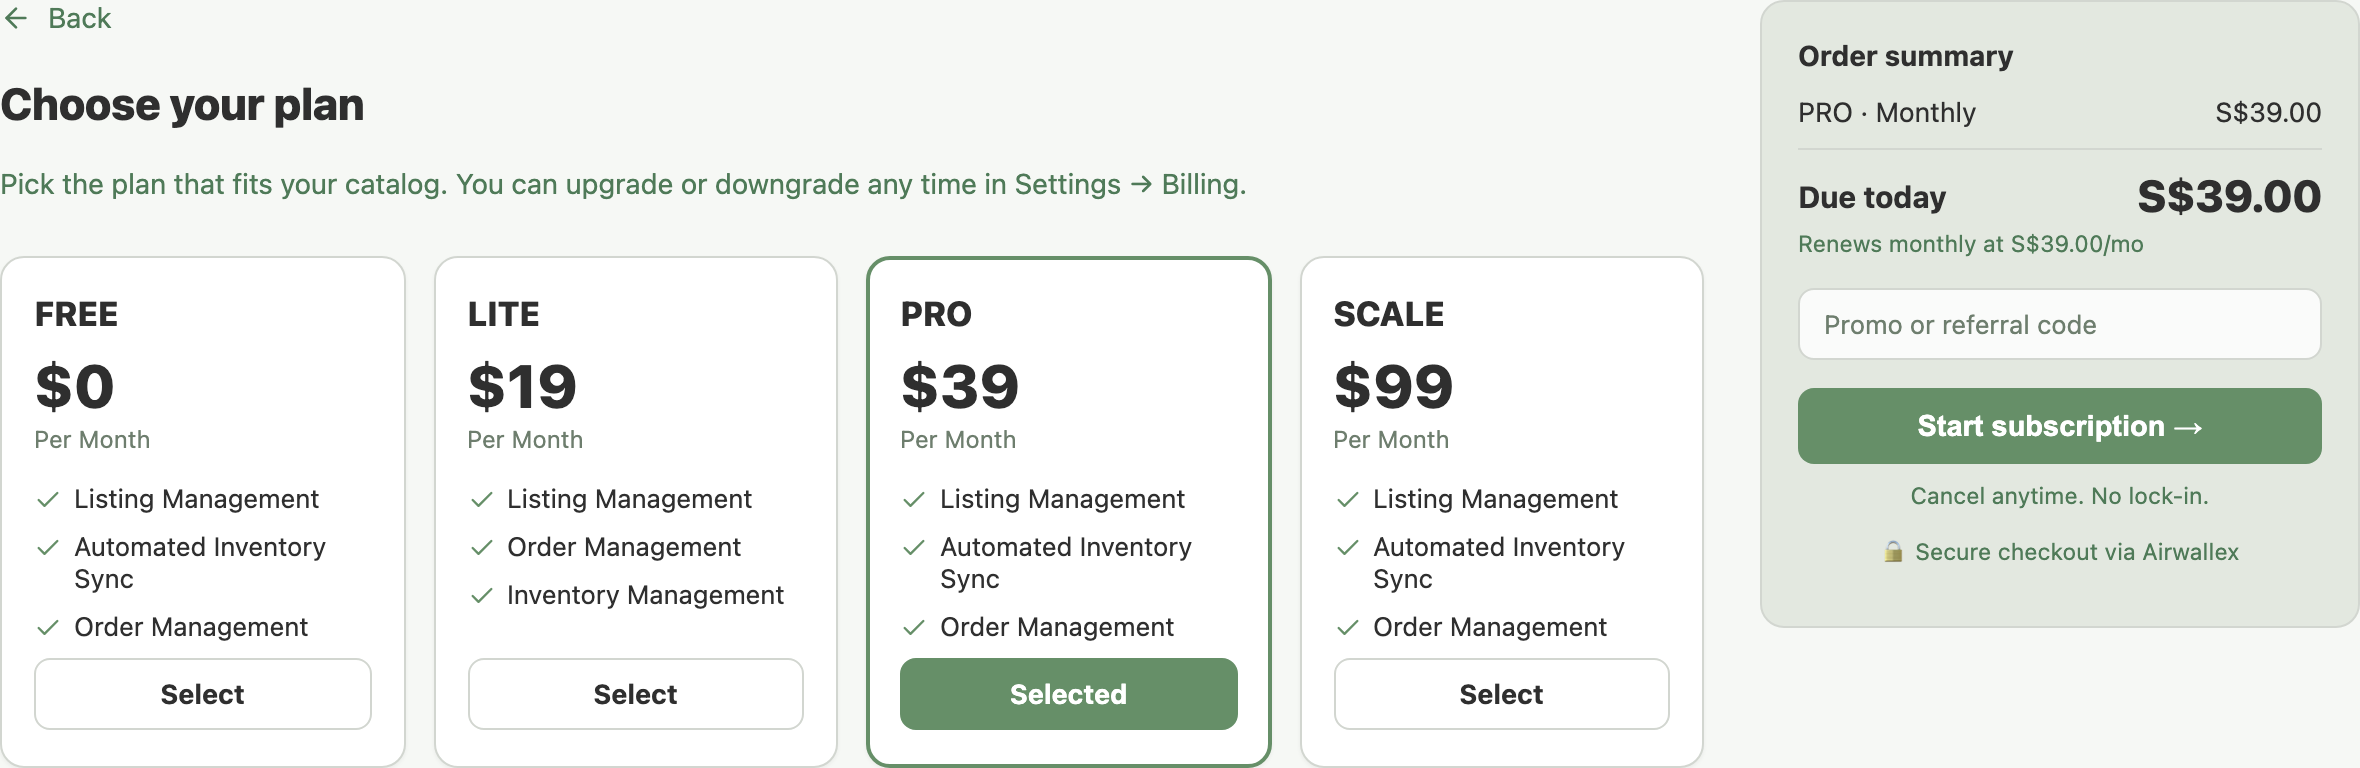
- Picking Free: click Continue with FREE (shown as Continue on FREE for some accounts) in the summary panel. No card, no redirect. You land straight on setup for your first store.
- Picking a paid plan: click the plan card, then review the price in the order summary. There's a Promo or referral code field here if you have one. Click Start subscription when you're ready.
Choosing a paid plan shows a secure card payment form from Airwallex right there on the page, so you stay on indexync.com to enter your card details and pay. The one exception: if you signed up through the Shopify App Store, you're sent to Shopify to pay instead.
Example: you want to try Indexync without spending anything. On the Choose your plan step, click Free's "Continue with FREE" button. There's no payment redirect: you go straight to connecting your first store with 20 SKUs and 30 monthly orders to work with.
Connect your stores and import your products
The wizard's last two steps are Connect your stores and Choose what to import. Both are skippable, so you can finish them later from your Dashboard checklist if you're not ready.
- Connecting a store works the same here as it does from Settings later. See Connecting Your Marketplaces for the full walkthrough of each marketplace.
- Choosing what to import uses the same Auto Import screen described in Importing Products from Marketplaces.
If the products you're importing add up to more than your plan's SKU limit, Indexync tells you before you import.

You'll see how many SKUs you've selected against your plan's limit, a suggested plan that fits everything, and the option to trim your selection instead of upgrading.
Example: you connect your Shopee store during onboarding and it has 35 products. You're on the Free plan, which allows 20 SKUs. The import screen shows "35 of 20 SKUs count toward your plan" and recommends upgrading to Lite (200 SKUs) to bring in everything at once. You can also trim your selection to 20 products and import those on Free, upgrading later.
What happens after you finish
Once you've picked a plan (and paid, if applicable), Indexync starts importing anything you selected and shows you a short welcome screen when it's ready. From there you land on your Dashboard, where a Getting Started checklist tracks the steps you still have left: connecting a 2nd store and syncing a product to 2+ stores. See Understanding Your Dashboard.
Your plan is active and visible any time in Billing (open your profile menu at the top right and choose Billing).
Signing up via the Shopify App Store
If you install Indexync from the Shopify App Store, you go through the same account-details and code-verification steps as a web signup, and the same profile and plan steps in the wizard. The only difference: your Shopify store is already connected by the time you reach the Connect step, so there's nothing to click there. Plan selection is not skipped or shortened.
Example: you install Indexync from the Shopify App Store. You still fill in email, password and country, verify by code, then complete your profile and choose a plan in the wizard exactly like a web signup. The only difference is that your Shopify store is already connected by the time you reach the Connect step, so there's nothing to click there.
Troubleshooting
The verification code isn't arriving
Check spam and junk folders first, and confirm the email address you typed at signup is correct.
- If it's been a few minutes with nothing, use the resend option on the code screen once the timer clears.
- If several resends still don't arrive, contact support with the email address you used.
The code keeps failing
Make sure you're typing the digits from the most recent email; an older code no longer works once a new one is sent.
- Too many failed attempts in a row temporarily locks the screen. Use resend to get a fresh code.
- Double-check for a copy-paste error if you're pasting the code instead of typing it.
My payment was declined
Your card is processed by Airwallex (or by Shopify, if you signed up through the Shopify App Store), so a decline usually comes from your card issuer, not Indexync.
- Confirm your card allows international or online transactions.
- Try a different card, or contact your bank if it keeps failing.
- You won't be charged twice for a failed attempt; retry from the Choose your plan step.
I can't get past the Complete your profile step
This step needs a first name, last name, and a valid phone number for your selected country. None of the three can be blank.
- If your phone number is rejected, check you're using the right format for your country (Indexync validates against your country's numbering plan).
- If you press Continue and the page doesn't move on within about 10 seconds, Indexync automatically re-reads your saved details itself; you don't need to do anything.
- If that also fails, you'll see: "Your details were saved, but the page could not refresh. Reload the page to continue." Your account and details are safe either way, so reload the page to pick up where you left off.
- If the step still won't advance for another reason, refresh the page; your account already exists from the OTP step, so nothing is lost.
FAQ
Do I need a credit card to sign up?
No. Choosing the Free plan needs no card at all. A card is only required if you choose Lite, Pro, or Scale.
What happens if I pick the Free plan?
You skip the payment step entirely and go straight into connecting your first store, with 20 SKUs and 30 monthly orders to work with.
Does the payment happen on the Indexync website?
Mostly yes. Choosing a paid plan shows a secure Airwallex card form right there on the page, so you enter your card without leaving Indexync. The one exception is signing up through the Shopify App Store, which sends you to Shopify to pay.
Can I change my plan after I sign up?
Yes. Your plan is always visible and changeable in Billing.
Is signing up through the Shopify App Store different?
Only slightly: your Shopify store connects automatically, so you skip the manual Connect step. You still fill in the same account details and choose a plan the same way.
Related articles
- Welcome to Indexync
- Connecting Your Marketplaces
- Importing Products from Marketplaces
- Understanding Your Dashboard
- Managing Your Account
Need more help?
Fill out our Feedback form, WhatsApp us, or email hello@indexync.com with:
- The email address you used to sign up
- Screenshots of any error message
- Which step you're stuck on