See and manage stock for every marketplace in one place
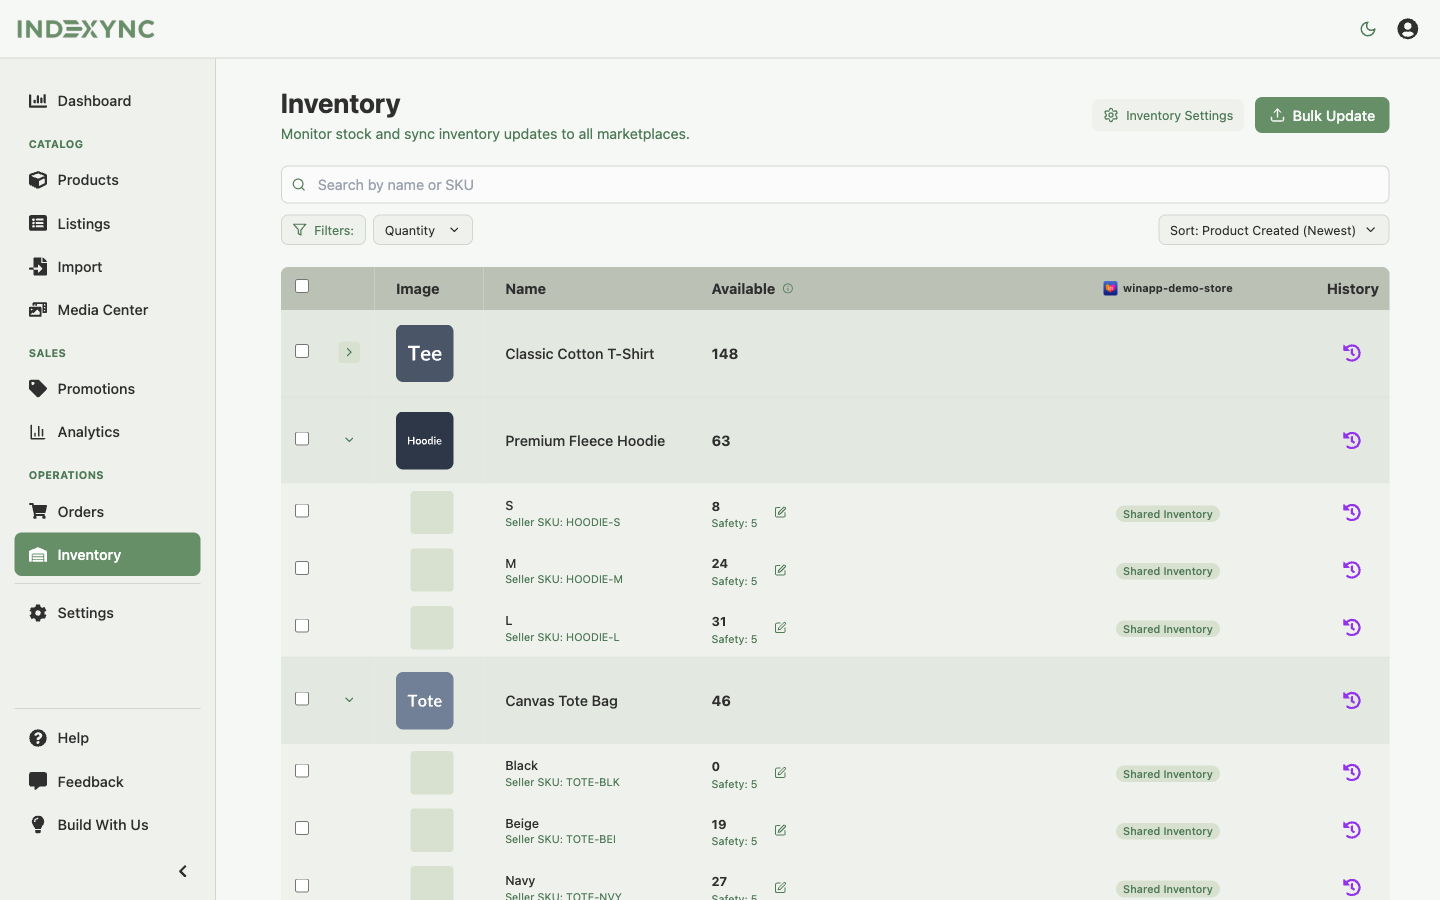
Indexync's Inventory page shows every SKU you sell, one row each, with a single Available count and a column for every marketplace you've connected. You can search or filter down to the SKU you need, sort the list, and open a full change history for any row without leaving the page.
Applies to: All plans.
Before you start: you need at least one product on file, either imported from a connected store or created in Indexync. The page fills in once you have at least one.
Opening the Inventory page
Click Inventory in the sidebar. If you don't have any products yet, the page shows a short prompt to add one instead of the table. Once you have at least one product, the full table loads with your SKUs and their current stock.
Reading a row
Each row in the table covers the following.
A SKU that's part of a linked group or a bundle also carries a small badge in the Available column. See Sync Rules for what those mean and how to set them up.
If a SKU is in Allocated mode, its per-store columns can differ from Available. That's the allocation working as intended, not a discrepancy. See How inventory sync works across marketplaces for the difference between Shared and Allocated mode.
Searching by name or SKU
Use the Search by name or SKU box at the top of the table. It matches your product name and Seller SKU, partial matches included. The list filters as you type; clear the box to return to the full list.
Filtering by available stock
Click the Quantity filter next to the search bar and pick an operation. Enter a number, and click Apply Filter.
Two more filters sit beside it: Status narrows the list to active or inactive SKUs, and the store filter narrows it to SKUs listed on the store(s) you pick. Every store's column stays visible; only the rows change.
- > (more than): SKUs with Available above the number you enter
- < (less than): SKUs with Available below the number you enter
- = (equals): SKUs with exactly that Available count
Clear the filter from the same control to return to the full list. If your search or filter matches nothing, the table shows "No inventory items found" with a hint to adjust what you searched or filtered for.
Example: to see everything below 10 units, set the operation to <, the value to 10, and click Apply Filter. Pair it with the Stock Low-High sort to put the lowest first.
Sorting
The Sort control at the top right defaults to Product Created (Newest). Click it to pick from six presets:
- Product Created (Newest): default, most recently created products first
- Product Created (Oldest): oldest first, useful for cleaning up legacy SKUs
- Name A-Z / Name Z-A: alphabetical
- Stock High-Low: most stocked SKUs first
- Stock Low-High: at-risk SKUs first, pair with the Quantity filter to find what needs reordering
Expanding a product to see variations
Click the expand arrow on a product row to see its variations. Each variation is its own SKU with its own Available count, per-store columns, and history.
Products without variations show no expand arrow; their single row is both the product row and the SKU row, and works the same as a variation row for editing or history.
Selecting rows to export or sync
Tick the checkbox on one or more rows and an action bar appears above the table with an "N selected" count, an Export to Excel button, and a Sync to Channels button.
- Export to Excel downloads the selected SKUs as a spreadsheet.
- Sync to Channels pushes your current Available stock out to every connected marketplace for the selected SKUs. This is the button to use if a store's stock looks out of date and you don't want to wait for the next automatic sync.
See Update Stock Quantities - individually or in bulk for how automatic sync works and when you'd reach for a manual one instead.
Viewing change history
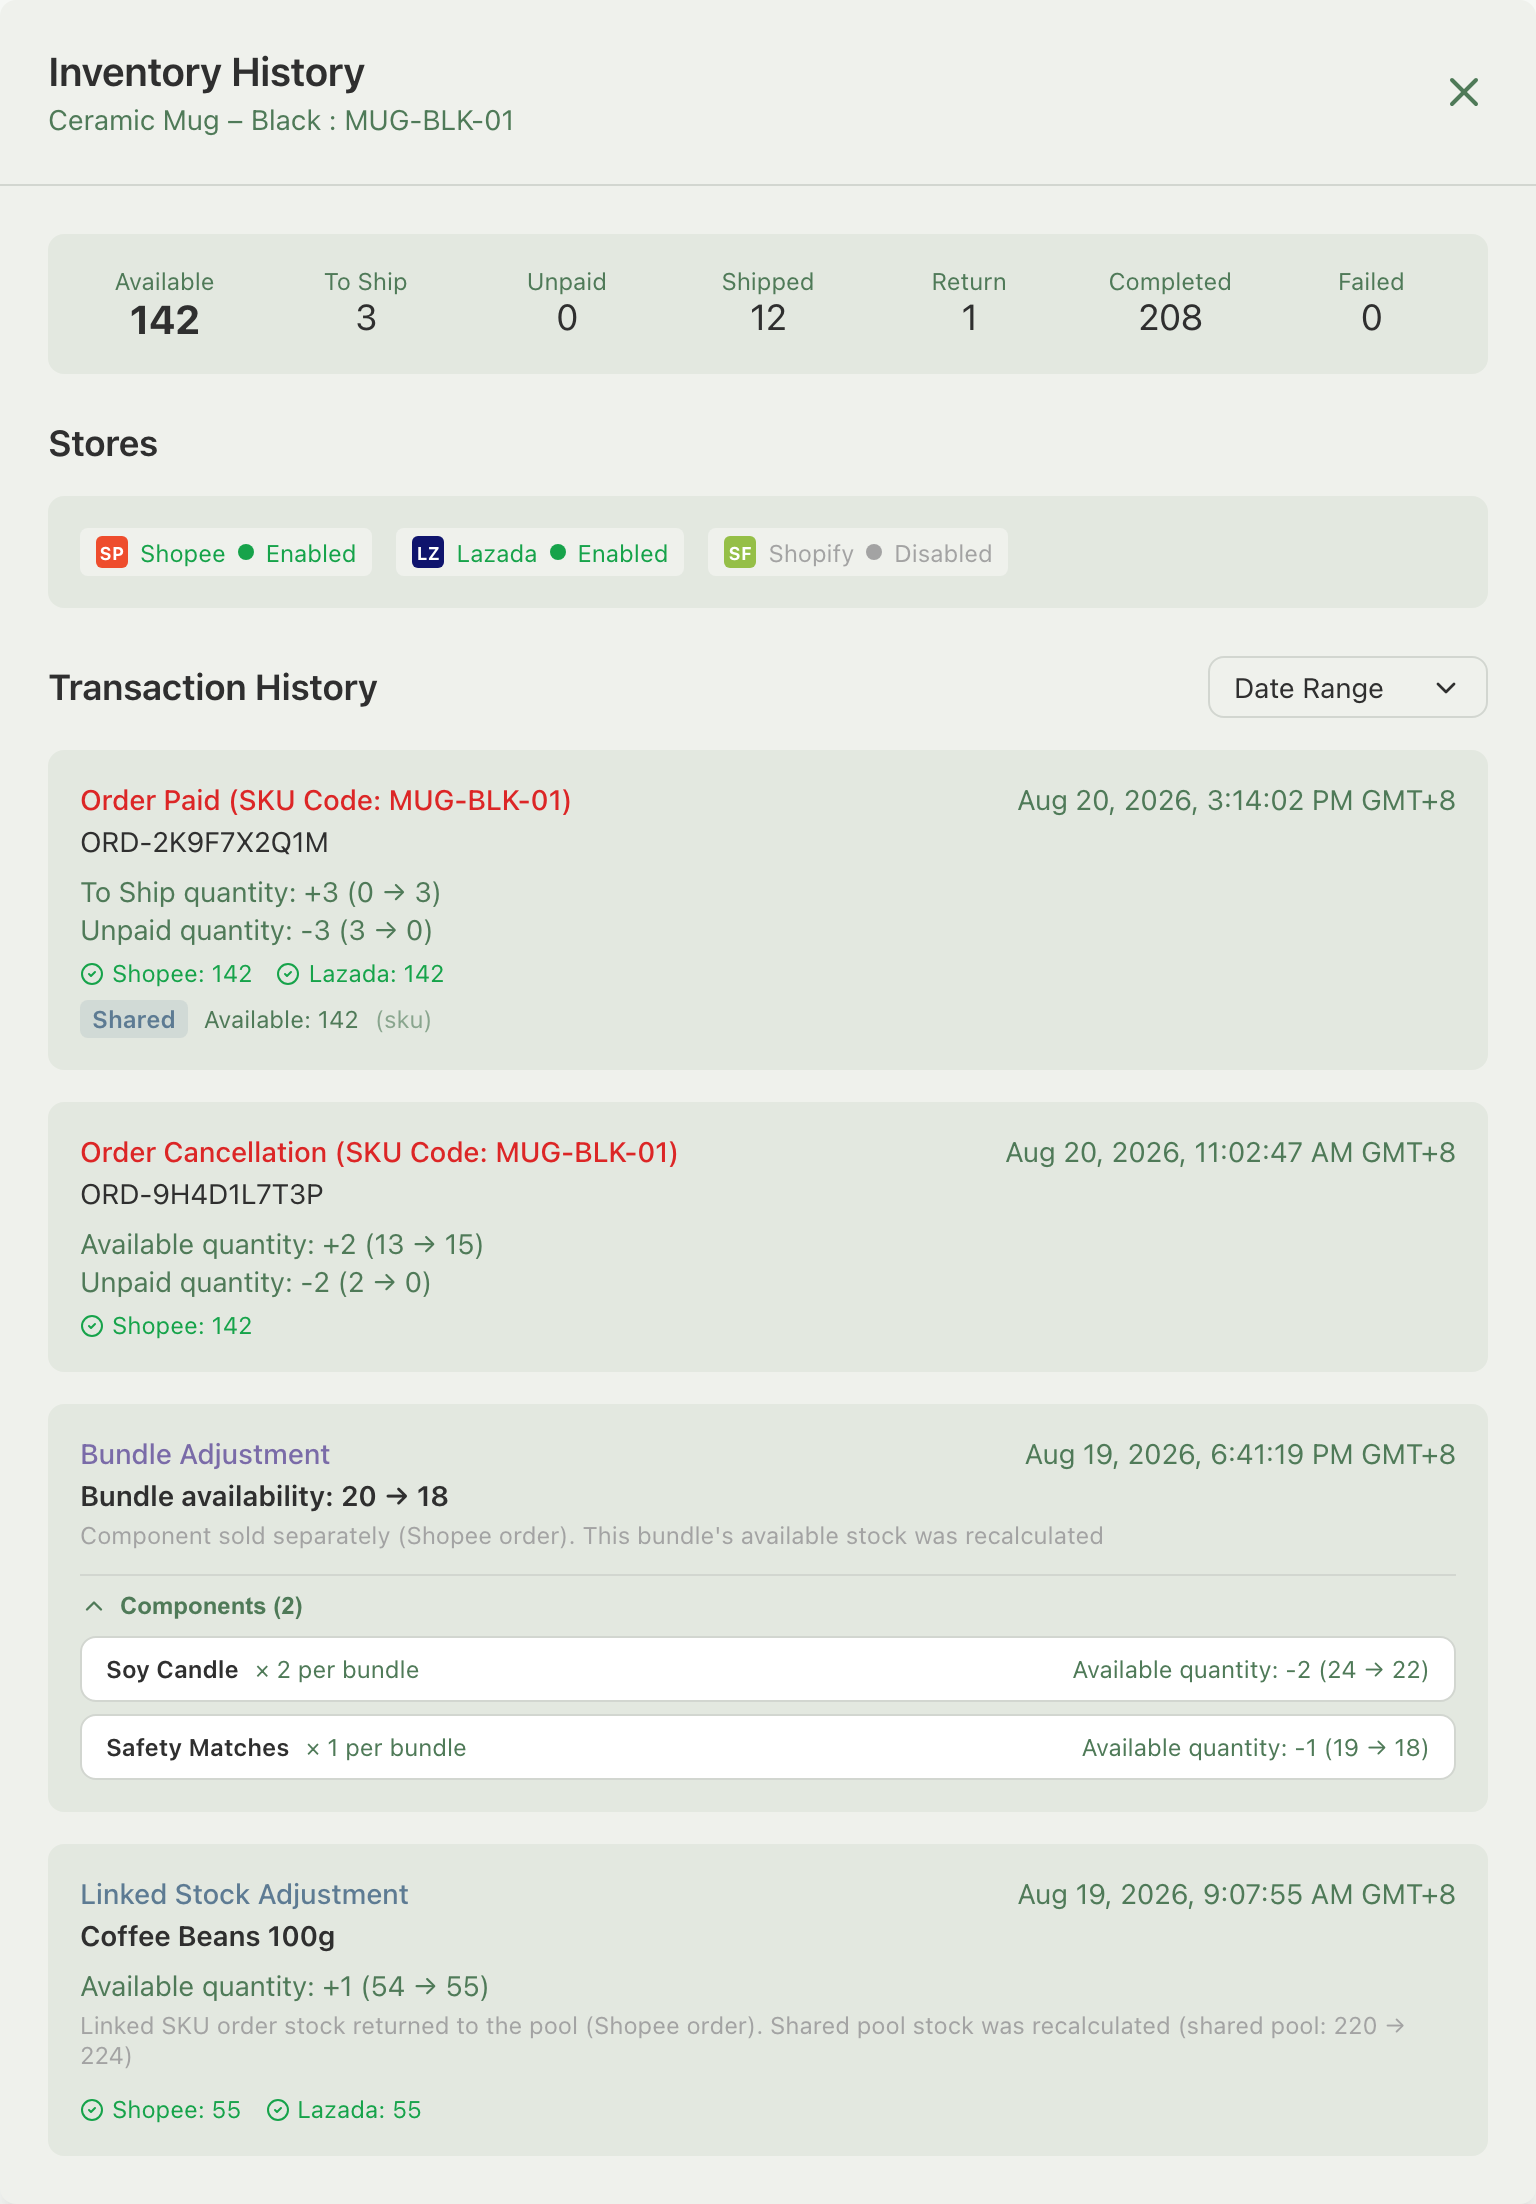
Click the History icon on any row to open the Inventory History panel for that SKU. The panel shows three things: the current status breakdown at the top (Available, To Ship, Unpaid, Shipped, Return, Completed, Failed; Return holds returned stock waiting for you to restock it; see What Happens to Your Stock on a Return or Cancellation), your connected stores and their sync status, and a Transaction History list below. A bundle SKU shows a dash for every status except Available, since order status is tracked on its components instead.
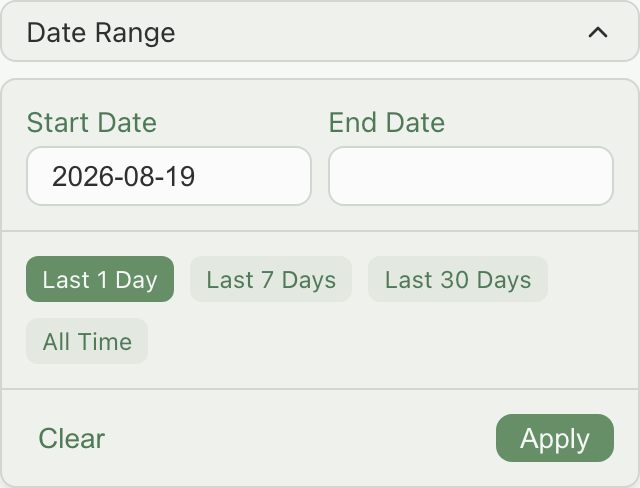
The panel opens on the last 1 day of history. Use Date Range to widen it up to All Time, or enter your own start and end dates, then click Apply.
What each entry means
Every entry answers three things: what happened, when, and how the number changed. The name of the entry tells you what caused it:
- An order moved your stock. The entry is named for the stage the order reached: New Order, Order Paid, Order Shipped, Order Completed, Order Return (units moved into Return), Restocked from Return (units you put back on sale), or Order Cancellation.
- A marketplace event moved your stock. Two entries are named for their cause. Failed Delivery Returned appears when a Lazada parcel that failed delivery comes back and its units move into Return. Restocked in Shopify appears when you restock an item in Shopify admin and Indexync records the same restock, so your Available count matches. This is recorded only for the Shopify location your store syncs stock from.
- You changed the stock yourself. The entry shows your change and, next to each store, a green or red icon telling you whether the new number reached that store.
- A marketplace push is still going out. The entry shows "Syncing to marketplaces..." until it finishes. Every entry is either in sync, pending or failed.
- A bundle's number changed because of its parts. One Bundle Adjustment entry per cause (a part sold on its own, sold through another bundle, or edited by hand). Click Components to see each part's own change.
- A linked SKU's shared pool moved. The entry shows the change in that SKU's own pack units, already converted from the pool. A Linked Stock Adjustment entry also shows its sync status, the same way a manual change does, so a failed push to a store shows up on the linked SKU too.
- Older entries from before these names existed keep their old labels, such as Manual Adjustment or Stock Added.
Examples of reading the history
Example: a SKU's number looks wrong on Lazada. Open its Inventory History panel: the latest entry shows green icons for Shopee, Shopify, and TikTok and a red one for Lazada, so you know exactly which channel to look at. See Why Doesn't My Stock Match Between Indexync and My Marketplace? for what to do next.
Example: a bundle's Available count dropped and you want to know why. Its most recent entry is a Bundle Adjustment showing bundle availability going from 20 to 18, with the cause "Component sold separately (Shopee order)." Expand Components to see it was the Soy Candle component, sold on its own listing, that pulled the bundle down.
Other actions on this page
Above the table, three buttons open tools this article doesn't cover in depth:
- Inventory Settings opens plan-wide settings like auto-sync and low-stock thresholds. See Inventory settings.
- Sync Rules creates and manages linked SKUs and bundles. See Sync Rules.
- Bulk Update (Pro and Scale) updates many SKUs at once from a spreadsheet. See Update Stock Quantities - individually or in bulk.
Troubleshooting
The page shows a prompt instead of my products. You don't have any products on Indexync yet. Add or import at least one and the table takes over.
A store's column doesn't match what I see on Available. That store's SKU is in Allocated mode, so it shows its own reserved portion rather than the shared Available figure. See How inventory sync works across marketplaces.
My search or filter came back empty. Check for typos in the search box, or that your Quantity filter isn't excluding every SKU you expect to see. Clear it and try again.
A sync icon shows a warning. Open that SKU's Inventory History panel; the latest entry shows a red icon for whichever store failed. See Why Doesn't My Stock Match Between Indexync and My Marketplace?.
FAQ
Can I see stock for all marketplaces on one screen?
Yes, in the way that matters: Indexync keeps one Available number per SKU and updates every connected marketplace to match it, so the Inventory page is the single place to check and change stock. The store columns show which stores each SKU syncs to, or your per-store split in Allocated mode. They are not separate counts read back from each marketplace.
How do I find a specific SKU quickly?
Use the Search by name or SKU box above the table. It matches partial text against both the product name and the Seller SKU as you type.
What does the History icon show?
It opens a panel with that SKU's current status breakdown, per-store sync status, and a full list of stock-changing events. These include orders, manual edits, and bundle or linked-stock adjustments. Entries go back as far as the date range you choose.
Why do two stores show different numbers for one SKU?
The SKU is in Allocated mode. You've split its stock across stores, so each store shows only its own reserved portion instead of one shared number. Switch it back to Shared mode in the Stock Allocation window if you want every store to draw from the same pool.
Can I filter to only low or negative stock?
For negative stock, yes: set the Quantity filter to < and enter 0. For low stock, set a threshold in Inventory Settings; Indexync then flags low-stock SKUs on your Dashboard, and clicking through from there filters the Inventory page for you.
Related Articles
- How inventory sync works across marketplaces
- Update Stock Quantities - individually or in bulk
- Sync Rules
- Why Doesn't My Stock Match Between Indexync and My Marketplace?
- Inventory settings
- What Happens to Your Stock on a Return or Cancellation
Need More Help?
Visit our Feedback page or contact us at hello@indexync.com.